
Check the Seam, Not Just the Silicone Bubble
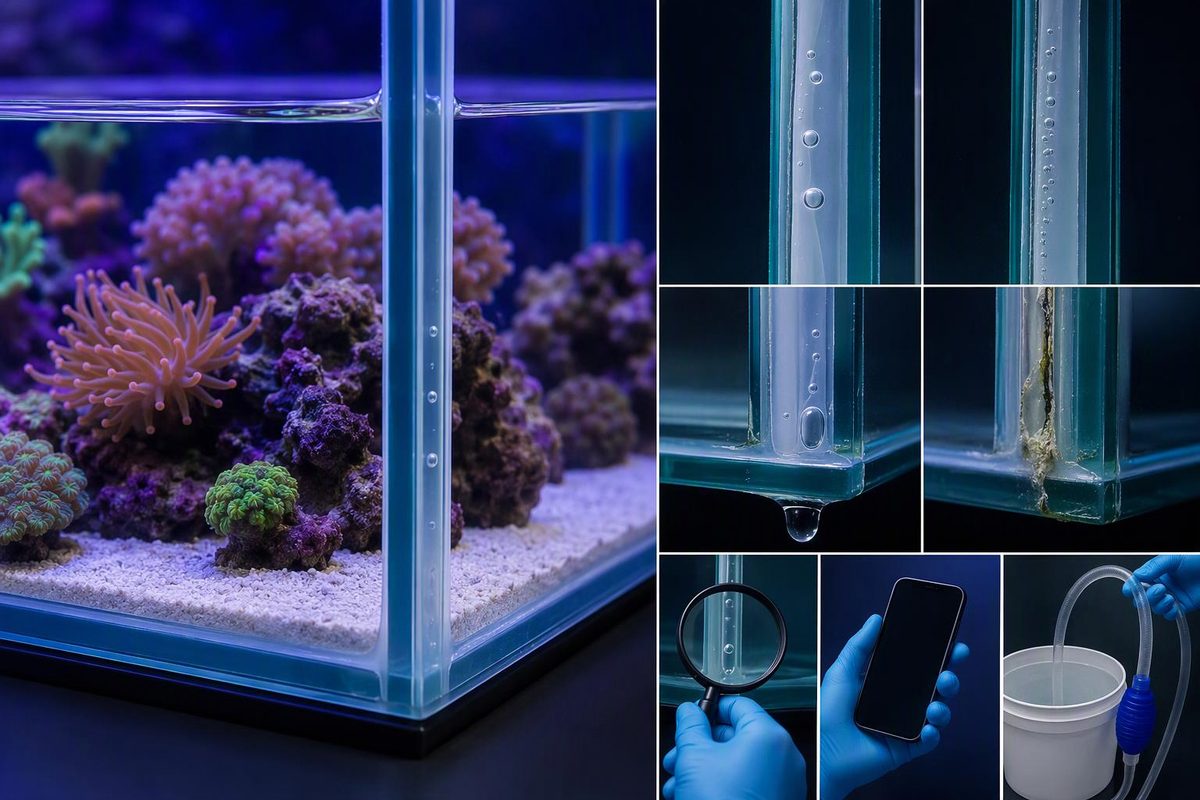
Identify whether a bubble is in the inner bead or structural joint, spot urgent leak signs, and decide whether to monitor, contact the maker, or drain.
A tiny, unchanged bubble in an aquarium’s inner silicone bead is not automatically a sign of failure. A void between the glass panels needs more caution, especially if it is new, growing, connected to an edge or leaking. There is no reliable universal rule that a bubble below a particular size—such as ⅛ inch—is safe; its location and any change over time matter more.
Select the mark’s location, condition and tank status for the appropriate next step.
Silicone Seam Triage
Use the strongest warning sign you can see. This check cannot certify structural strength.
The location, strongest warning sign and tank status are needed for a result.
Reference Actions
| Finding | Starting Action |
|---|---|
| Stable inner-bead mark | Photograph and monitor |
| Void between panels | Request the maker’s assessment |
| Growing, edge-connected or separating seam | Do not fill, or prepare to drain |
| Leak or nearby damage | Transfer livestock and drain in a controlled way |
Source note: This triage uses the seam locations and warning signs documented in the accompanying article; no bubble-size threshold can certify a seam.
Locate the Bubble Before Judging It
Clean and dry the outside of the glass, then inspect the seam with a flashlight from several angles. Rule out water droplets, algae, residue and reflections on the glass before evaluating the silicone.
| What You See | Likely Location | What to Do |
|---|---|---|
| Bubble moves or wipes away | Glass surface | No seam repair needed |
| Small, enclosed spot in the triangular bead inside the tank | Inner sealing bead | Photograph and monitor if isolated and unchanged |
| Clear, pale or silver-looking void directly between adjoining glass edges | Panel-to-panel joint | Ask the manufacturer to assess it; do not fill a new tank |
| Void reaches an edge, forms a channel or has enlarged | Possible loss of adhesion | Treat as urgent, particularly in a filled tank |
| Moisture, salt crust or an active drip originates at the seam | Leak path | Begin a livestock transfer and controlled drain |
In one common glass-aquarium construction method, silicone injected between the panels holds the aquarium together, while a separate bead seals the inside corner. Custom Aquariums also describes inspecting completed seams against a bright light for inconsistencies (Custom Aquariums). Designs vary, so ask the maker how your model is assembled rather than assuming every visible bead has the same role.
A flaw in the inner triangular bead is therefore not necessarily equivalent to a void in the bond between two panels. The inner bead keeps water from reaching the corner, but the panel joint may be part of the tank’s load-bearing assembly. The exact roles depend on the aquarium’s construction.
Air-free application matters in structural silicone bonding generally. Sika’s structural-glazing guidance calls for joints to be completely filled and silicone to be applied free of air bubbles (Sika). That guidance is not an aquarium pass/fail standard, but it helps explain why a defect’s position and extent within a load-bearing bond matter more than its appearance alone.
Tank dimensions, glass thickness, bracing and joint design all affect the load. Without the aquarium maker’s design specifications, a photograph cannot establish how much structural capacity remains around a panel-joint void.
A Changing Seam Calls for a Drain
Act promptly if you find any of these signs:
- a bubble or pale area that has grown since an earlier photograph;
- several voids joining into a line along the panel edge;
- silicone pulling away from the glass;
- water, dampness or salt creep originating from the seam;
- a cracked or chipped panel near the joint;
- damaged bracing, visible panel movement or support that does not meet the manufacturer’s instructions.
For an occupied reef, prepare a clean holding container with matched saltwater, heat and circulation. Move livestock before shifting rockwork or rapidly lowering the display. Keep biological media and live rock wet and oxygenated, then test ammonia after the transfer. The same biofilter principles apply as those explained in how nitrifying bacteria work in aquarium biofilters.
If there is an active leak, begin lowering the water while arranging the transfer. Do not leave the aquarium operating simply because the waterline is now below the defect. Lowering the pressure may slow the leak, but it does not restore the seam.
Do not rely on tape, exterior glue, a clamp or pressure against the glass as a lasting repair. Avoid moving a filled aquarium; shifting it can place additional stress on the glass and seams.
Document a New Aquarium Before Filling
For a new or empty aquarium, photograph the entire seam and take close-ups with a ruler for scale. Include the tank model, serial number, purchase date and whether the mark reaches a joint edge. Send those details to the retailer or manufacturer and request a written assessment.
Do this before scraping the seam or adding silicone. Warranty terms may exclude modification or attempted repair. Aqueon’s warranty, for example, excludes damage resulting from modification, tampering or repair attempts by anyone other than the company (Aqueon). That is Aqueon’s policy, not a universal warranty rule, so check the terms for your tank. Keep the receipt and packaging until the issue is resolved.
If the manufacturer accepts the seam, leak-test the empty tank where escaped water cannot damage the home. Use the specified stand and confirm that the aquarium is level and supported as instructed. Fill gradually while checking every seam.
Loctite likewise advises filling slowly after an aquarium repair and watching whether the seam remains secure (Loctite). A leak test may reveal a leak; it cannot certify the future strength of a questionable structural bond. Passing a short test also does not override a manufacturer’s rejection of the seam.
Spot-Filling Does Not Restore a Structural Bond
Smearing new silicone over a bubble does not establish that the bond between the panels has been restored. It may hide the area without replacing compromised material inside the joint, and cured silicone is not repaired merely by coating its exposed surface.
A deteriorated inner bead and a suspect panel-to-panel bond are different repair jobs. Resealing an inner bead requires an empty, dry aquarium and removal of the old inner seal without cutting into the structural joint. Reconstructing the panel-to-panel seam requires separating panels, preparing the glass, forming the correct joint and allowing a controlled cure.
For a display aquarium—particularly a large one—replacement or evaluation by an experienced aquarium builder is generally the lower-risk choice when the panel-to-panel bond is in question. A cosmetic patch is not evidence that the tank can safely carry its original load.
Use only a sealant whose manufacturer explicitly approves it for aquarium manufacture or repair and for the intended saltwater use. “100% silicone” by itself does not establish suitability. ASI, for example, identifies its 509 sealant for aquarium manufacturing and repair in saltwater and freshwater systems (Meridian Adhesives). Follow the selected product’s application and cure instructions rather than a generic online cure time.
For an isolated, stable mark in the inner bead, take a sharp baseline photograph from a repeatable angle and inspect it during routine maintenance. For a void between panes, a growing mark or any leak, stop treating it as cosmetic: contact the tank maker, transfer the reef if necessary and take the aquarium out of service.