
Unlock the Beauty of Urchin Shells: Anatomy, Safe Cleaning, and Display Tips for Reef Keepers
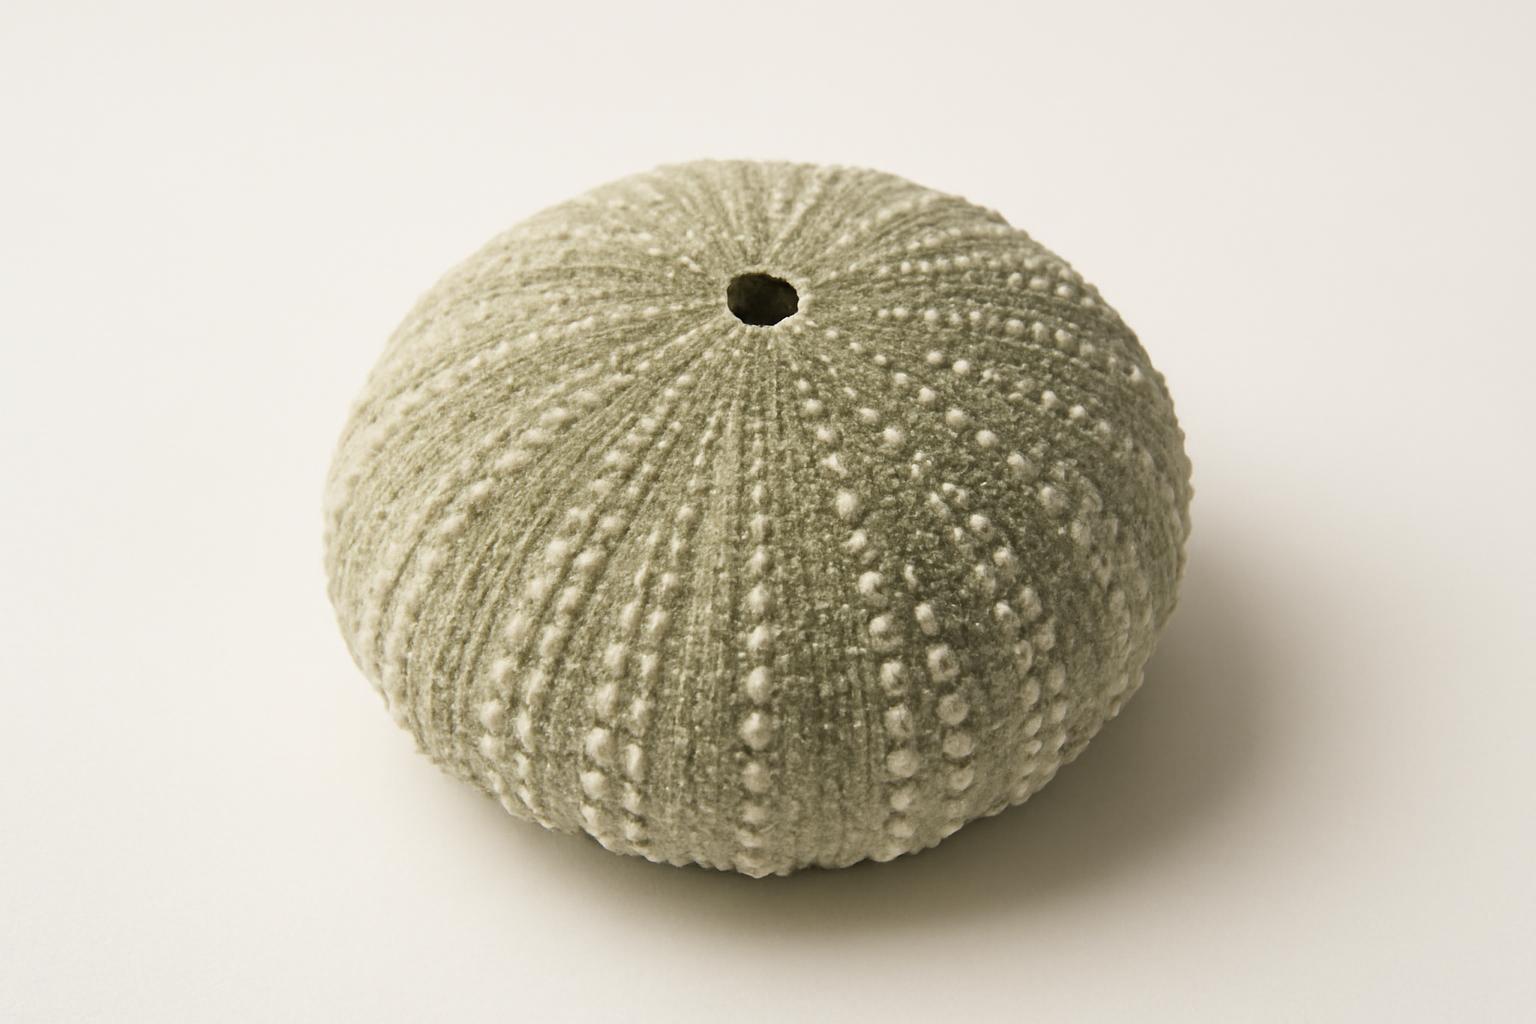
Once soft tissue is gone, the empty test can crack, chip or crumble under surprisingly little pressure. Cleaning methods vary, and reef-tank safety is unproven.
An urchin shell is one of those beach finds that looks almost designed rather than grown. Even when empty and weathered, it still shows the patterned pores, plate geometry, and five-part symmetry that make sea urchins so recognizable within the echinoderms.
For reef hobbyists, that appeal is not only decorative. A cleaned test can also make the anatomy of a live urchin easier to understand. It shows, in miniature, how a grazer with movable spines and tube feet is built around a rigid calcareous framework. For coastal decorators and collectors, the same object is simply striking on a shelf or in a mixed shell display.
One caution matters from the start: the available material on urchin shells is uneven. Basic anatomy is reasonably well supported by biological descriptions, but much of the practical advice on collection, cleaning, bleaching, and preservation comes from hobby tutorials and seller pages rather than museum or conservation protocols. So this guide separates firmer biology from lower-confidence, source-dependent how-to advice.
What follows is a careful overview of what an urchin shell actually is, what kinds of shells are commonly sold or found, how hobby sources suggest distinguishing dead from live specimens, how cleaning methods vary, and how to use cleaned tests as decor without confusing shelf display with aquarium use.
What Is an Urchin Shell? Anatomy and Structure
What most people call an urchin shell is more properly the test. In sea urchins, the test is a hard, shell-like part of the animal’s endoskeleton rather than an external shell in the way most people think of a clam or snail shell.
Biological descriptions in the available sources describe the test as a rigid calcareous framework that encloses the soft body. Its wall is built from ten double rows of tightly fitted dermal ossicles, meaning calcified plates. Those plates meet along sutures, creating a structure that is rigid but not massive. That is one reason a complete test can feel surprisingly light in the hand.
The layout of those plates reflects the echinoderm body plan. Sea urchins share the classic pentamerous, or five-part, symmetry seen in their relatives. Even when the spines are gone, that five-part organization is still visible in the repeated patterning of pores and plates across the test.
The spines themselves are not random projections. They attach at raised points called tubercles, and the joint is described as a ball-and-socket type articulation. In the living animal, muscles at the base help move the spines. That detail matters for anyone looking closely at a cleaned shell, because the bumps, knobs, and tiny openings on the surface are not just ornamental; they are evidence of how the living urchin functioned.
That same structure also explains the shell’s contradictory feel. An urchin test is plainly mineralized and hard, but it is still a joined assembly of plates rather than a thick, uniform mass. Once the soft tissues are gone, the empty test can crack, chip, or crumble with much less pressure than people expect.
For intact beach finds, one shell guide describes complete tests as commonly around 5 to 10 cm across. Many washed-up finds, of course, are only fragments. Commercial decor shells are often smaller, especially in craft-oriented listings.
Color can be part of the appeal, but it is not a simple identification key. Across beach-shell descriptions and seller catalogs, commonly mentioned colors include purple, green, lilac, white, plus pinkish, cream, and other pale tones. One shell guide associates purple finds in Portuguese waters with species such as Paracentrotus lividus, while commercial listings often label pink shells as Echinometra mathaei. Those names can be useful clues, but weathering, bleaching, fading, and seller terminology all complicate shell-only identification.
For reef keepers, the test is also a useful teaching object. Sea urchins are algae-grazing echinoderms, and seeing the test makes it easier to connect the living animal’s shape, spines, and movement to the rigid framework underneath. In that sense, an urchin shell is both decor and anatomy reference.
Common Types, Colors, and Species of Urchin Shells
If you browse shell catalogs, craft listings, or coastal decor shops, you will quickly notice that “urchin shell” is a broad market category. Some labels appear to track actual species. Others seem to describe color forms, trade styles, or general appearance more than strict biological identity.
Among the seller labels that appear repeatedly are:
- Pink urchin shells, often labeled Echinometra mathaei
- Green urchin shells, sometimes labeled Lytechinus variegatus or described regionally, such as “Philippine green”
- Purple urchin shells, including listings that use Mesocentrotus franciscanus
- Sputnik urchins, often tied to names such as Phyllacanthus parvispinus
- Alfonso or calico urchins, which appear as commercial decor labels
It is best to treat those as seller terminology first and as taxonomy second. Commercial names can be useful when shopping, but the available evidence does not show that all listed names are consistently applied, and one beach-shell source explicitly notes that differences among species are often much clearer in the live animal than in an empty shell.
That same source says spine features are especially helpful when the animal is alive: spine length, spine color, and overall appearance can distinguish species better than an empty, weathered test can. Once a shell has lost its spines, faded in the sun, or been bleached, identification becomes less certain for non-specialists.
Color is the most obvious difference most buyers notice. Across the seller pages and shell guide in the evidence pack, the most commonly repeated hues are:
- Purple, lilac, or violet
- Green
- Pink
- White
Some sources also mention blue-grey, yellow, or reddish-brown tones. In practice, a shell’s color may reflect species, local population, age, sun exposure, cleaning method, or simple natural variation. That makes color helpful for style selection, but imperfect for confident identification.
Size also shifts by context. A natural-history style shell guide describes intact tests around 5 to 10 cm, while commercial listings tend to emphasize smaller craft and decor sizes, commonly in the rough 1- to 5-inch range. That does not mean one source is wrong and the other is right; it mostly reflects that online decor sellers often stock smaller specimens suited to bowls, ornaments, jewelry, and grouped displays.
Another point worth keeping clear is that imperfection is normal. Multiple seller pages say their urchin shells are natural items and may have approximate sizes, worn edges, small chips, uneven coloration, or other irregularities. That is not just sales-page disclaimer language; it is consistent with what you would expect from real, fragile, calcified tests.
For buyers and collectors, the most practical takeaway is this:
- Use color and general condition to choose a shell you like.
- Treat trade names such as sputnik, alfonso, or calico as shopping labels unless you have stronger identification support.
- If accuracy matters, label a specimen conservatively: “seller-identified,” “likely,” or “purple urchin shell” is often more defensible than a definitive species name.
For reef hobbyists, that caution has a familiar feel. Just as fish and coral common names can drift in the trade, shell labels can be useful without being fully authoritative.
Sourcing Urchin Shells: Beach Collection vs. Commercial Purchase
Most people get an urchin shell in one of two ways: by finding a dead test on the beach or by buying one from a seller. The available evidence supports describing the tradeoffs, but not giving a sweeping sustainability verdict.
The clearest point in the source material is simple: do not take live sea urchins. The hobby cleaning tutorials are consistent on that. Their advice is to collect only dry, dead specimens, typically from the high wrack line or high tide line, where debris has washed up and dried.
Those same tutorials use practical beachcombing cues rather than formal scientific tests. A dry, empty, partly spineless shell high on the beach is treated as a much better candidate than a damp, intact urchin in active surf or attached to habitat. One guide also mentions the smell test: if a specimen smells strongly of decay, it may be dead but still full of tissue, which makes it less pleasant to transport or clean.
What the evidence does not establish is a full environmental or legal framework for collecting dead tests. The research base here does not verify where dead-shell collection is permitted, how it is regulated by place, or what its ecological impact may be in every setting. So the most defensible statement is narrower: avoiding live collection is clearly preferable to taking living animals, while the acceptability of taking dead tests is not fully resolved by the available material.
Commercial purchase is the easier route if you want a specific look or do not have access to beaches where tests wash ashore. Seller catalogs in the evidence pack show a broad mix of green, pink, purple, white, sputnik, and calico-style shells sold for crafts, jewelry, ornaments, home decor, table styling, and events.
A few buying patterns show up repeatedly in those listings:
- Sizes are approximate
- Natural flaws are expected
- Photos are not always exact predictors of what you receive
- Some sellers mention quick handling or returns, but those are store policies, not evidence of quality or ethics
More important than shipping convenience is what many listings do not say. The evidence pack does not establish that commercially sold urchin shells are sustainably sourced, legally collected in every case, or traceable to low-impact collection methods. It also does not show that trade names are always taxonomically reliable.
So if you are buying rather than finding, the most useful screening questions are not “How fast does it ship?” but questions like these:
- Does the seller clearly say the shells are natural?
- Is the shell described by a size range rather than only a photo?
- Are imperfections disclosed up front?
- Is the specimen sold as a cleaned shell, or might it still have tissue or spines?
- Does the listing explain whether the name is a species identification or just a trade label?
- Is there any meaningful origin or sourcing disclosure?
The evidence here is simply stronger on condition and labeling than on sustainability. That makes it reasonable to be cautious. If you want to minimize the chance of harming live animals, the safest conclusion from the sources is to avoid collecting live urchins and to treat commercial sourcing claims conservatively unless they are specifically documented.
How to Identify Live vs. Dead Urchin Shells on the Beach
This is the most important practical distinction in the whole topic. Before you think about cleaning an urchin shell, you need to decide whether you are looking at a dead test or a live sea urchin.
Here again, the available guidance is mostly from hobby beach-cleaning sources, so it should be read as practical field advice rather than formal diagnostic biology. In those tutorials, a dead specimen is more likely to be described as:
- Found on the high, dry wrack line or high tide debris line
- Dry rather than freshly wet
- Often already missing many or most spines
- Sometimes showing a clear center opening
- Sometimes carrying an odor if tissue remains inside
A live urchin is more likely to be:
- Damp, submerged, or recently washed
- Still covered in intact spines
- Showing spine movement
- Showing tube feet
- Obviously still in active habitat rather than lying dried among beach debris
If you see movement or obvious fresh moisture, the available sources point in the same direction: leave it alone.
The easiest shells to work with are the ones nature has already done most of the cleaning on. One hobby tutorial specifically says it prefers specimens that have already lost their spines and have a large empty opening, because much of the messy internal material is already gone.
That said, dead does not mean sturdy. A separate cleaning guide emphasizes that these shells are very fragile, and may break because of tiny cracks that are hard to see before you start handling, soaking, or rubbing them. That fragility is important enough to treat as part of identification: a shell may be dead and collectible in principle, yet still too compromised to survive much cleaning.
So the practical hierarchy in the available material is:
- Do not take live animals
- Prefer dry, clearly dead finds
- Prefer shells that are already partly cleaned by weather
- Expect even dead shells to be brittle
For reef keepers, this is also where the hobby perspective matters. The goal is not to turn a living grazer into decor. The appeal of a collected test is precisely that it is the empty structure left behind, not a living animal taken for display.
Step-by-Step Guide to Cleaning Urchin Shells
The cleaning advice in the available sources comes from hobby tutorials, and those tutorials do not present a single standardized protocol. Their details differ on soak duration, bleach strength, and drying style. What they do share is a general sequence: dry if needed, loosen spines, remove internal hard parts and debris, then finish gently.
A cautious reading of those sources suggests thinking in stages rather than treating any one set of timings as universal best practice.
1. Dry the shell first if it is still damp or odorous. One tutorial recommends leaving beach-found urchins outside, in sun, for several weeks so the spines loosen and internal remnants dry enough to shake out. Another suggests simply leaving a smelly find outside or in a garage first because fresh remains can smell unpleasant. This is the slowest approach, but it is also one of the least forceful.
2. Soak only if the shell needs help loosening spines or tissue. This is one of the points where sources disagree. One tutorial suggests soaking dry urchins in water for a couple of hours. Another suggests at least a day in hot water that is then left to cool. Taken together, these are better read as examples than as a settled standard: shorter soaking may be enough for a dry, hollow specimen, while fresher shells may need more time before material loosens.
3. Remove loosened spines gently. Both tutorials describe low-tech methods: rubbing with fingers, using a brush, toothbrush, skewer, or in one case even fine steel wool. The safest shared principle is not the tool itself but the pressure level. The goal is to detach spines without grinding into the test surface.
4. Remove the Aristotle’s lantern if it is still inside. The hard jaw structure of a sea urchin, known as Aristotle’s lantern, often remains inside the shell. Hobby guides say you can work around the center opening with a dental pick, skewer, or similar narrow tool, loosen surrounding soft material, and ease the lantern out. Some collectors save it as a separate specimen because it is intricate in its own right.
5. Clear out remaining debris. After the lantern is removed, the same tutorials suggest shaking out dried fragments, sand, and other loose material. One guide describes working through the center opening; another mentions removing a small piece at the opposite end to gain access. Because that second method intentionally sacrifices part of the shell, it is better understood as one tutorial’s workaround for a stubborn specimen, not a universal recommendation.
6. Repeat gently as needed. If debris remains, the sources suggest light rinsing and careful picking with tweezers or a skewer. The consistent warning is that the shell is fragile and can lose the contest quickly if you force it.
On safety, the tutorials are fairly modest. Gloves are optional in their wording, but both acknowledge that remaining spines can prick skin, so gloves are a sensible choice if the shell is still spiny or if you are handling several specimens. An airy work area also makes sense, especially if you are dealing with old marine tissue or later moving on to bleach.
For reef-minded readers, the bigger lesson is restraint. An urchin test is not tough because it looks architectural. The hobby sources repeatedly imply that patience preserves more shells than aggressive scrubbing does.
Bleaching, Drying, and Preserving Urchin Shells
Bleaching and preservation are the most variable parts of the available how-to advice. The sources here do not establish a validated museum-style treatment. They show what hobbyists commonly do, along with some recurring warnings.
Two tutorials suggest different bleach mixes and timing:
- A weaker solution around 1/8 bleach to water for about 1 hour
- A stronger solution around 1 part bleach to 3 parts water for about 30 minutes
Those numbers should not be read as a single agreed formula. What matters more is the overlap: both tutorials describe brief exposure to diluted bleach, followed by rinsing. Both also warn that leaving the shell in bleach too long can make it more brittle.
On color change, the evidence is mixed. One tutorial says longer bleach exposure can lighten the shell, while a commenter in the same discussion reported little visible difference even after extending the soak. So a fair summary is that visual results are inconsistent, but the risk of over-bleaching is repeated often enough to take seriously.
After bleaching, both tutorials call for a thorough fresh-water rinse. That point is straightforward and consistent.
Drying advice also differs:
- One source prefers sun drying, mainly because it is faster
- Another recommends shade drying to reduce color fading
Those are not truly contradictory so much as different priorities. Sun may speed drying; shade may better protect color. The available material does not prove one method universally superior.
For preservation, both tutorials describe using a roughly 1:1, or 50/50, mix of white craft glue and water, often with Elmer’s glue specifically named. The idea is to add support without burying the shell under a thick coating. The mixture may be poured into the shell and rotated to coat the inside, or applied by dipping or painting.
Again, it is better to frame this as a hobby practice than as a formally validated conservation technique. Still, the pattern across both tutorials is consistent enough to describe:
- Clean the shell first
- If bleaching, keep it brief and diluted
- Rinse thoroughly
- Dry fully
- Use diluted craft glue if you want extra support for handling or display
The main mistake the sources warn against is chasing a whiter or more “perfect” shell so aggressively that the test weakens. With urchin shells, preservation usually means accepting some natural wear rather than trying to force a pristine finish.
Displaying and Using Urchin Shells as Reef Room Decor
Once cleaned, an urchin shell works best as a display object. The seller pages in the evidence pack repeatedly market them for:
- Table decor
- Home displays
- Wedding or event styling
- Vase fillers
- Wall art or mirror projects
- Ornaments
- Jewelry and crafts
- Gift arrangements
Those same listings often pair them with familiar coastal elements such as starfish, sand dollars, and other shells. Visually, that makes sense. A sea urchin test contributes a rounded, perforated, highly patterned form that contrasts with flatter shells and stars.
For reef hobbyists, the decorative use can also be more specific than generic beach decor. An urchin test is one of the few dead-shell objects that directly illustrates the body plan of an animal many aquarists recognize as an algae grazer. It can make a reef-room shelf feel less like themed decor and more like a small natural-history display.
A few evidence-supported uses fit that audience especially well:
- A single intact test on a stand or shelf as a specimen piece
- A grouping of small shells in related colors
- A mixed marine display with sand dollars, starfish, and other shells
- A simple anatomy display that includes a saved Aristotle’s lantern beside the test
The practical limitation is fragility. Even after reinforcement, a test remains a delicate object better suited to stable display than casual handling.
One boundary is especially important for reef keepers: the available sources do not establish that beach-collected, bleached, or glue-reinforced urchin shells are suitable for use inside a reef aquarium. The evidence here supports out-of-tank decorative and educational use. It does not provide aquarium-safety validation.
That does not make the shell irrelevant to aquarium interest. Quite the opposite. Looking at the empty test can help make sense of the living animal’s design: a rigid skeletal case, movable spines, and the distinctive mouthparts that hobbyists know as Aristotle’s lantern. For a reefer, that educational angle is the real connection.
Safety Tips and Common Pitfalls in Handling Urchin Shells
The risks around urchin shells are not dramatic, but they are predictable.
The first is sharp spines. Even detached spines can prick skin, and shells that still carry partial spines deserve careful handling. The hobby tutorials present gloves as optional, but they also acknowledge that rubber gloves can be helpful, especially if you have tender skin or are working through a batch of shells.
The second is brittleness. Both cleaning guides stress that the shell can break easily, and one specifically notes that tiny cracks may cause a shell to fail during cleaning. That means gentle handling is not just nice in theory; it is central to preserving the specimen.
The third is over-bleaching. The tutorials do support bleach use, but only as a short, diluted step. Longer soaking may or may not noticeably change color, but it is repeatedly associated with weakening the shell.
The fourth is poor ventilation. One source specifically warns about working with bleach in an airy area. Even before bleach enters the picture, old marine tissue can smell unpleasant, so indoor cleaning in a poorly ventilated space is not ideal.
The fifth is mistaking natural flaws for product defects. Seller pages repeatedly say real shells may vary in size, shape, and finish, and may show chips or uneven coloration. That is worth remembering when buying online or comparing beach finds. A slight asymmetry or worn edge is often part of what proves the shell is natural.
For reef hobbyists, there is also one conceptual pitfall: treating a cleaned shell as if it were automatically a safe aquarium material. The sources do not support that jump. A beach-found decorative specimen and an in-tank biological material are not the same category.
In practical terms, the lowest-risk approach supported by the evidence looks like this:
- Avoid collecting live urchins
- Prefer dry, clearly dead shells
- Expect fragility, even in intact-looking specimens
- Clean with light handling
- Treat bleach as a brief, source-dependent option, not a cure-all
- Use ventilation
- Accept natural imperfections
That approach will not guarantee every shell survives, but it aligns better with the limited and somewhat variable source base than any claim of a single foolproof method would.
What colors are most common for urchin shells?
Across the shell guide and commercial listings in the evidence pack, the most commonly mentioned colors are purple, lilac or violet, green, pink, and white. Some sources also mention blue-grey, yellow, or reddish-brown tones. Color is useful for shopping or describing a specimen, but it is not a perfect identification tool because weathering, bleaching, and seller naming can all affect how a shell is presented.
How do I remove the Aristotle’s lantern from an urchin shell?
The hobby cleaning tutorials suggest working through the center opening with a dental pick, skewer, or similar narrow tool. The basic idea is to loosen the remaining soft material around the hard jaw structure, then ease the lantern out gently. The sources emphasize patience rather than force, because the test is fragile and can crack while you work.
Can I use bleach on urchin shells, and for how long?
Yes, but the available advice is tutorial-based and variable, not standardized. One source uses a weaker bleach mix for about an hour, while another uses a stronger dilution for about half an hour. The common ground is brief, diluted exposure followed by a thorough rinse. Both sources warn that leaving the shell in bleach too long can make it more brittle.
Are urchin shells safe for reef aquariums?
The available material does not establish that cleaned urchin shells are aquarium-safe, especially after bleach treatment or glue reinforcement. The sources support their value as decor and as anatomy references, not as proven in-tank reef additions. The safest evidence-based conclusion is to treat them as out-of-tank display items.
What makes urchin shells fragile during cleaning?
A sea urchin shell is a calcified test made of joined plates, not a thick, uniform shell. That construction leaves it light but brittle once empty. Cleaning adds stress through soaking, rubbing off spines, removing internal parts such as Aristotle’s lantern, and bleaching. The tutorials also note that hidden cracks can cause shells to fail unexpectedly during handling.